Using the Research Study Design Canvas: 9 Steps from Idea to Protocol
Aug. 5, 2021, 8 a.m.

Are you looking for an intuitive, social, and fun way to design a research project? Design canvases are a great way to develop a team-based and fluid plan. Thanks to Alexander Osterwalder who is credited with the inception of the Business Model Canvas in 2005, we now have a highly visual method to display our plans.
Getting Started
First, make sure you have a copy of the STAT59 Research Study Design Canvas. We prefer to print these out onto a 24 x 36 inch poster and hang it on the wall. Next, get a bunch of sticky notes. We usually use the small 2" x 2" notes. The idea here is to write each idea on its own sticky note so that they can be easily moved, replaced, deleted, or updated. Then, assemble your team. This may be you alone, or, it may be your research planning team. We prefer smaller, more agile teams at this stage, probably 8 people or fewer.
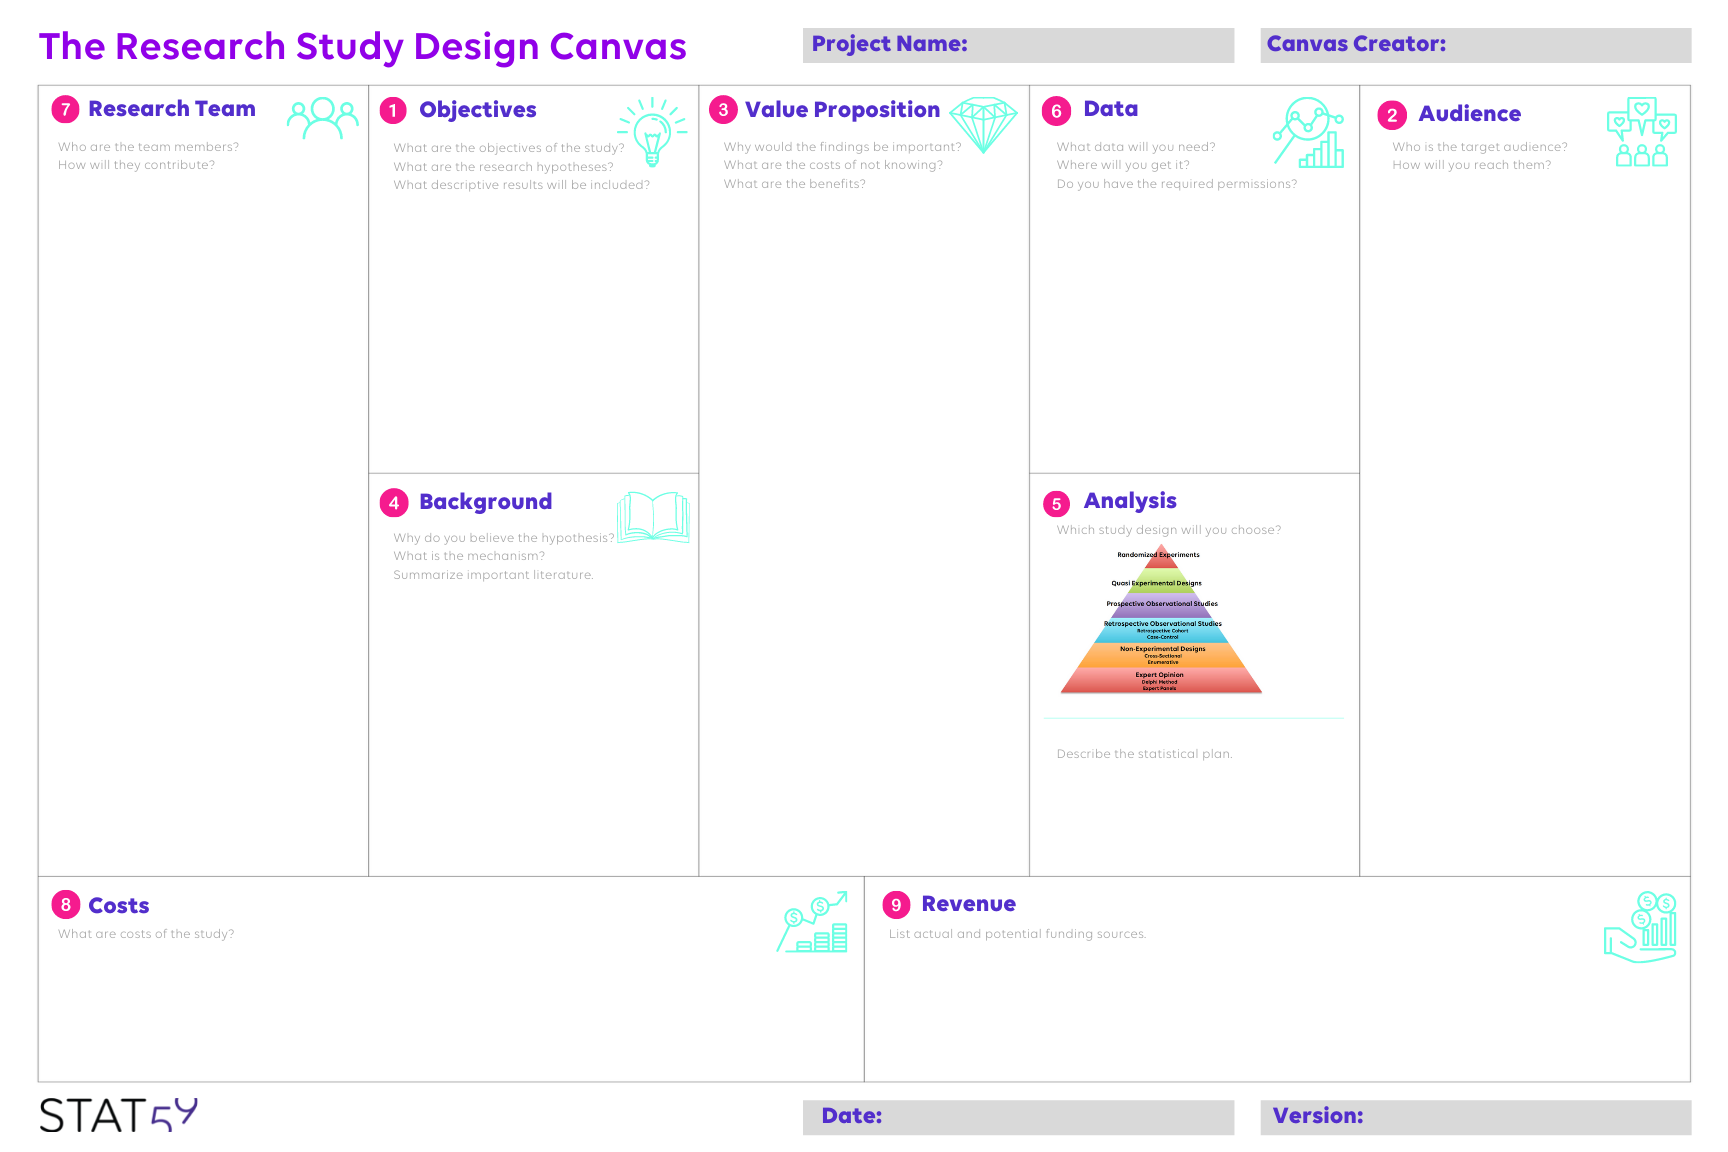
Hang the poster on the wall. Write a snazzy name for your project at the top.. Put your name in the Canvas Creator box. Write the date at the bottom, and version if you like. Grab some pens, coffee, snacks if you are so inclined, and get ready to have some fun. Just follow these simple 9 steps to get your project rolling.
1. Objectives
This first step in using the Research Study Design Canvas is to think about the objectives of the study. This is often the most difficult piece of research design. The first question to ask yourself (and your team if you have one) is "What am I trying to prove?" Taking a few minutes here to carefully consider this question can be very enlightening. And, knowing what you are trying to prove will shape the rest of the canvas and your project.
On a sticky note writhe the single primary objective of the study. Remember that the best studies have a clear and focussed single primary objective. If you have carefully considered the "What am I trying to prove" question, this objective often is strikingly obvious.
For qualitative studies, write the hypotheses:
- On one sticky note, write the research hypothesis.
- Write the null hypothesis on another note.
- Use a third note to write the alternative hypothesis
Finally, use another sticky note to describe any additional descriptive outcomes. These are outcomes that you will include in the results and discussion of your project, but that will not be part of formal hypothesis tests.
Having some trouble settling on the objectives? Make sure to take your time at this point. Getting the objectives correct is critical. Maybe the team needs a break? Maybe it is a good time to speak with some content experts? See our short YouTube Video on setting objectives for some inspiration.
Once you are sure your objectives are correct, you are ready to move on to the second step.
2. Audience
Defining the audience for your study is critical. The research team should carefully consider the question: "Who cares?"
Write a brief description of the target audience on a sticky note, and place it in on the research design canvas. If you are targeting several groups, use a separate note for each. Also, think about the channels you will use to reach the audience. A textbook? Journal Article? Blog post? Instagram? List each potential channel on its own sticky note.
3. Value proposition
The second part of the "Who cares?" question looks at the value the research project will provide for the target audience.
Think about why the findings of the study would be important to the audience and write it on a sticky note. If you have several reasons, use several sticky notes. What are the costs of not knowing the answer? What are the benefits to knowing the answer? Taking time early in the research study design process will ensure that the study remains focused on truly solving a problem. And, as a bonus, sorting this out here on the Research Study Design Canvas will make writing the discussion of your project a snap.
4. Background
Writing the background - or introduction - to a scientific paper, poster, abstract, or even LinkedIn article can be tricky. We want to make sure that we provide adequate but not excessive background. But how?
In this step, the team should consider the question, "Could this possibly be true?"
Start by writing a brief description of the mechanism of how your hypothesis could be true. Try, as much as possible, to rely on facts and principles rather than wild speculation.
Next, find at least three references that support your mechanism. It may be a good time to take a break here, and do a quick search on Medline, Google Scholar, or another academic database. Write a quick citation for these articles and place them on the canvas. These are the articles you will cite when you write the introduction to your project.
A quick pro-tip. Make sure to refer to the audience when thinking about the background. The level of explanation and the character of the reference articles must match the target audience.
5. Analysis
Setting the analysis - or study design- is next.
Choosing the methodology can be tricky. A useful paradigm is to aim as close to the top of the Evidence-Based pyramid as you can reasonably attain. It involves a careful balance of cost versus sophistication. Having trouble? Consider speaking to some members in the target audience, and ask them what level of evidence would be necessary for them to believe your hypothesis. Hint: If you are considering several options, our YouTube Channel has an introduction to many common study designs.
Next, write a brief description of the statistical plan. Get help if you need it. This is a great time to involve the statistician or analyst. It is much easier to ask for help now to plan a good design than to ask for help later to fix a bad design.
6. Data
At this stage, it should be obvious what data will be needed. Look back at the analysis plan. A simple rule is to attain all the data needed to prove your hypothesis, and no more than that. Write a brief description of the data needed on a sticky note and apply it to the canvas.
Knowing what data you need, how will you get it? Where will the data come from? How will it be accessed? How will it be recorded?
Next, think carefully about permission. Do you have permission to use the data for research purposes? A common fallacy is assuming that having permission to see the data also gives you permission to use it for research. This, unfortunately, is not true. I have seen many student projects ruined when eager students planned fantastic designs, only to find that they did not have permission to use the data for research. Make sure the team has a plan to pursue the correct ethical and logistic permission for data access.
7. The Research Team
Write a sticky note for each team member. With a name and short list of responsibilities. And add the sticky notes to the canvas.

When thinking about the team construction, look back at the research study Canvas so far and make sure your team is complete:
- Who will perform the analysis?
- Who will collect the data?
- Do we have a content expert who can write the background?
8. Costs
What are the costs of the study?
Write a sticky note for each cost category. This can include financial costs (money) or other costs (infrastructure, time, etc).
9. Revenue
How will the costs of the study be addressed. Use the space on the canvas to list actual and potential funding sources. This is a great time to ask your friends, colleagues, and mentors about potential funding sources.
Am I Done Now?
Are you done? Not yet. One of the most important feature of design canvases is that they are fluid documents. The best way to keep your canvas up to date and relevant is to hang it in a place where all the team members can see it. It is common for research projects to change over time: new funding sources may become available, team members come and go, and data may not be available. With the Research Study Design Canvas, you can simply change the sticky notes as the project develops.
What about version control? How do you keep track of the changes? In most cases, the canvas is best thought of as the current best plan. Personally, I like to photograph the canvas before major changes are made, and the photographs serve as an archive.
Finally, the canvas is designed as a tool to aid your thinking. It is not a rigid protocol to be followed, but rather a suggested road map.
Are you using the canvas for your project? Have you found new ways to use the canvas? Let us know on Twitter, Facebook, or Instagram. We would love to hear your thoughts.
Are You Ready to Increase Your Research Quality and Impact Factor?
Sign up for our mailing list and you will get monthly email updates and special offers.